I don’t have sound on my blog so you’ll just have to pretend you hear a drum roll, okay? Cause big news is about to be shared.
Ready?
Hubby has completed renovation of the master bedroom closet.
Why renovate the closet in a six or so year old house? Because neither of us have ever liked that closet. We’ve sort of gotten used to the fact that you have to walk through it to get to the master bathroom, but we never liked that there was carpet on the floor in there. That just seemed very odd when the bedroom has a hardwood floor and the bathroom is tiled. And the shelves were arranged in the oddest configuration. There was a built-in ironing board, but no electrical outlet. The switch for the light was in the bedroom instead of inside the closet where it should have been.
It was just a stupid little room. So, since that man of mine is not afraid of big projects and actually enjoys wood working, he made built-in cabinets.
I told you about the closet plans back in March. First, there was the making of the sawdust. This isn’t just a little bit of sawdust, folks, because Hubby buys unmilled wood.
You know how a two-by-four only measures 1.5″ x 3.5″? That’s milled wood. Hubby buys wood by the board foot then cuts them down to size. My making of the sawdust post explains that a bit more. And had pictures.
Then there was ripping the old closet guts out or “deconstruction.” There was another phase — installation of the hardwood floor — I somehow did not manage to capture.
Anyway… it is done. And it looks REALLY good.
This is what the closet used to look like…
Closet "Before" Shot
And here are the after pictures…
Standing in the bedroom, looking through the closet and into the bathroom.
It’s hard to take good pics of the closet because it is a rather small room.
Overhead storage with two cabinets on each side.
My side of the closet. Lowest cabinet houses hamper baskets.
Looking from bathroom, through closet and into bedroom.
Hubby's side of the closet.
Same side, different angle.
My side of the room.
Hubby's side holds the linens, too.
Hubby's side of the room.
Hubby's full hamper baskets.
So there you have it. Thoughts?
I need to run and finish doing that laundry. My baskets were both full, too. Since my girlfriends were here for the weekend, the laundry didn’t get done until tonight.
Be sure to let Hubby Mike know how you like his craftsmanship.
Now that the closet is finished, I can finally paint and decorate the bedroom! Woo hoo!!!
Things have been a bit weird for me lately. My level of motivation to do pretty much anything has been in the single digits. Very low, single digits.
But yesterday, I am proud to say, I FINALLY finished something.
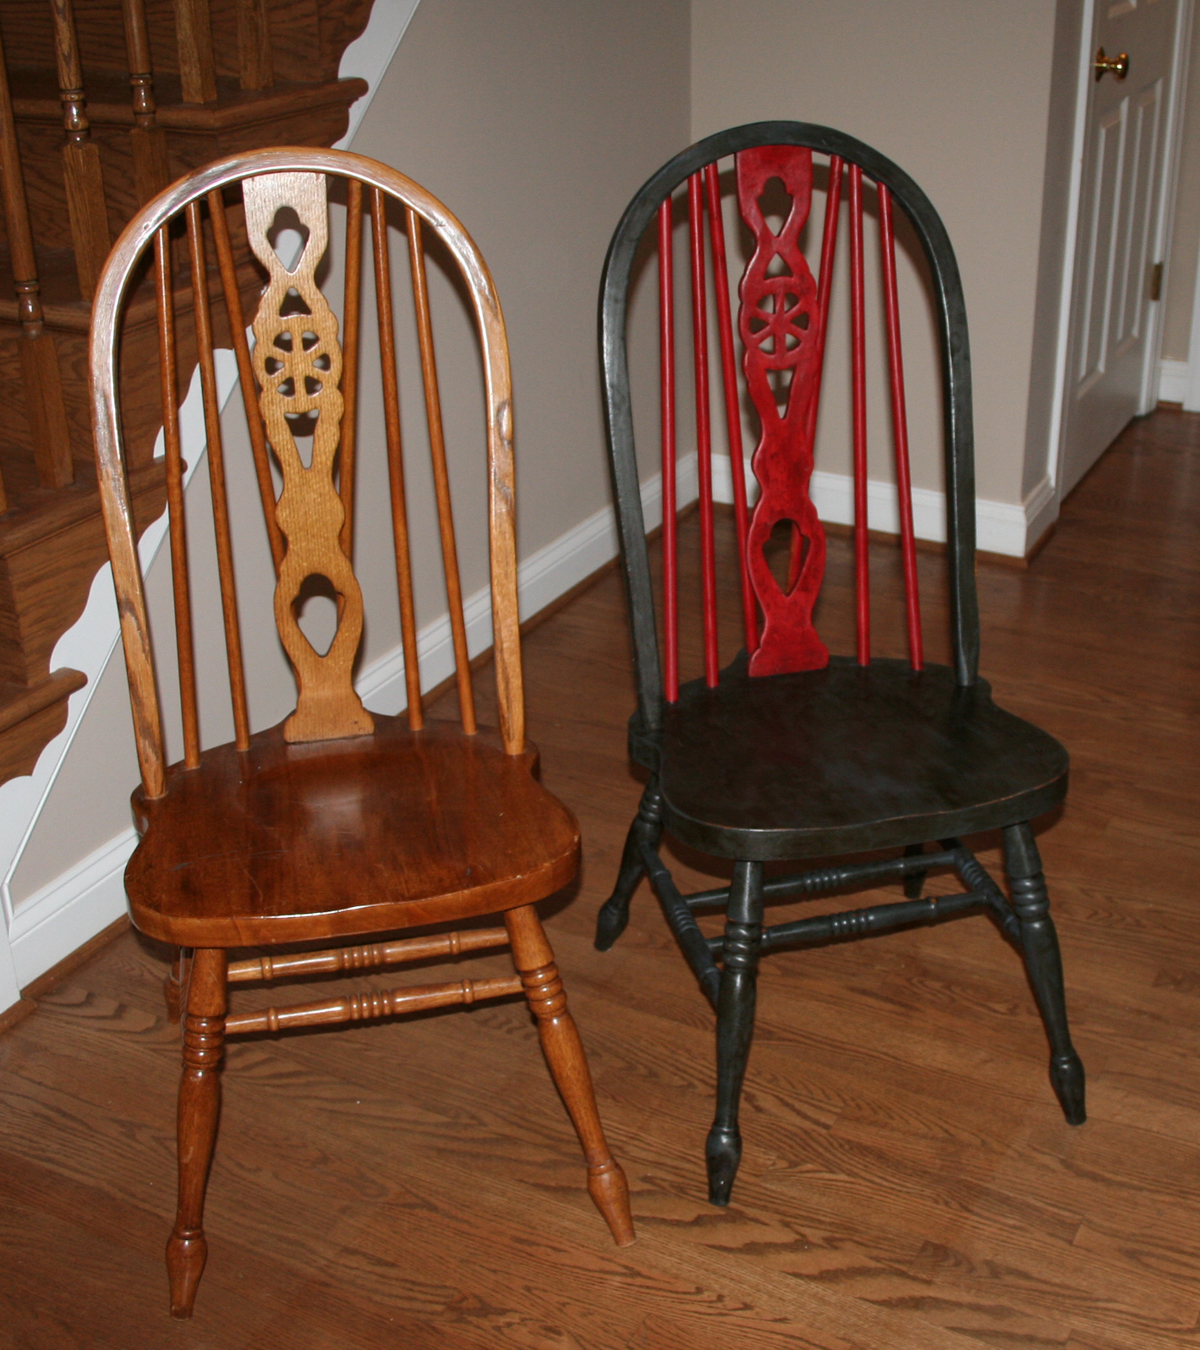
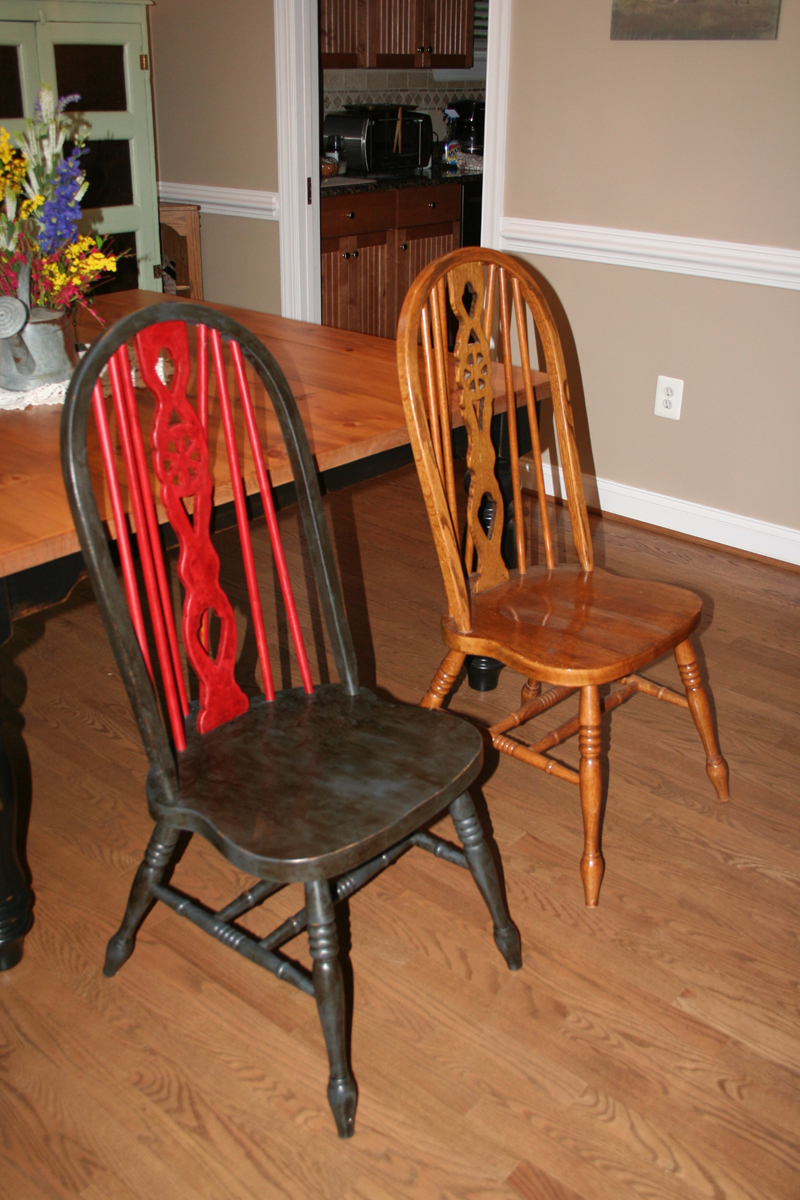
Back in July, I painted one of the dining room chairs I bought right before we left Maryland. It didn’t turn out so well.
Before and After 1 (July 2012)
Actually, that’s a bit of an understatement. It was awful.
Looks-wise, it was okay. But it had WAY too much wax on it.
Before and After 2 (July 2012)
You can sort of see what I mean in the second shot. Not the overabundance of wax, just the ugliness.
The chair has been sitting since July. Waiting for me to strip the layers of wax off and re-apply more wax. More-sparingly this time.
I stripped and added a second coat of graphite-colored Annie Sloan Chalk Paint (ASCP) to most of the chair over the course of a couple of evenings last week. The red is primer red. The graphite still wasn’t dark enough for me (ASCP doesn’t come in black). So I topped the graphite off with some ebony-colored wood stain.
Yesterday I added the clear wax over the graphite and then a layer of clear wax followed by dark wax over the red.
I think the chair looks much better.
Before and After (December 2012)
But I am not sure all of that effort was worth it to achieve black with ASCP.
Chair After Shot (December 2012)
I think I’ll use a different type of black paint on the next chair. I’ll stick with the primer red ASCP for the red bits, though.
Chair After (December 2012)
The chair does go much better with the table now. Although the table legs are a bit shinier than the chair, so I may want to add some poly or something over the paint.
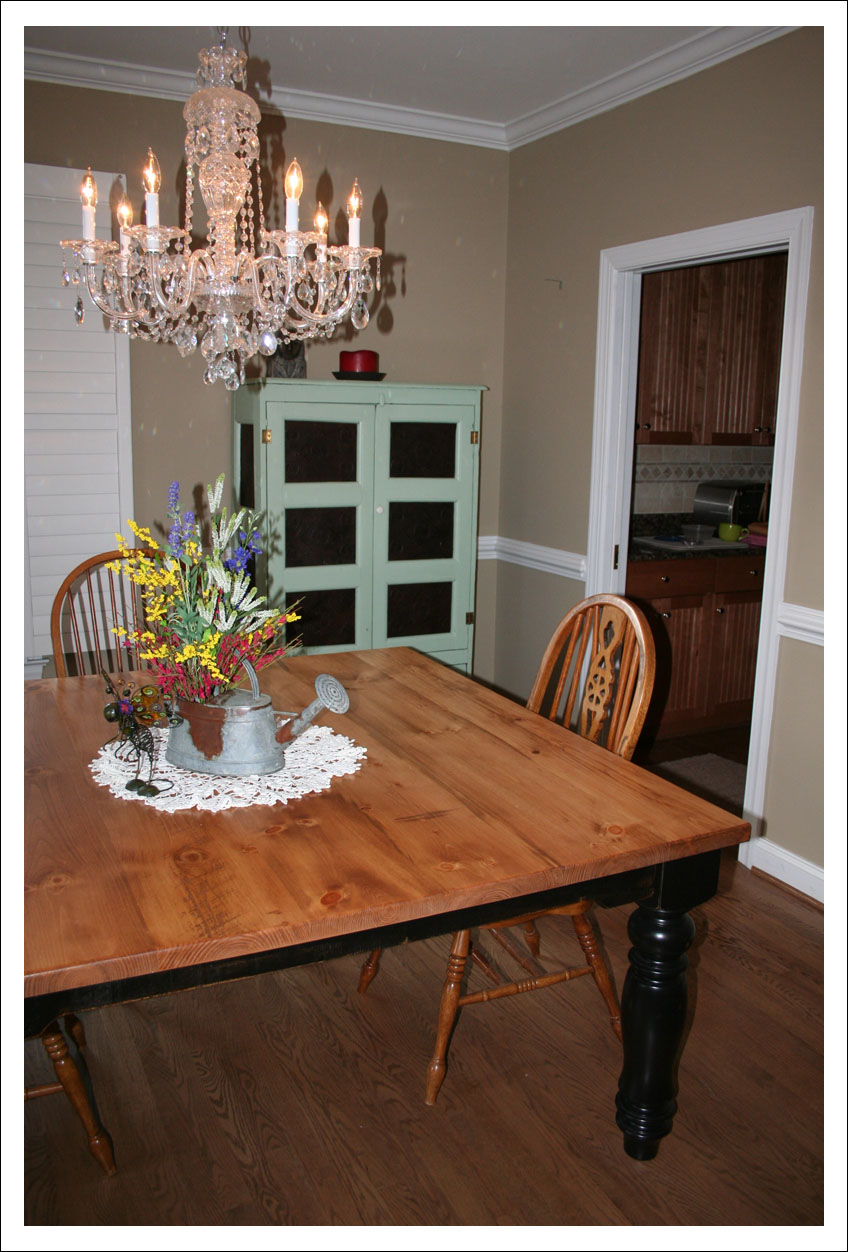
The pie safe I bought a while back is still that hideous sea-foam green. You did catch what I said about lack of motivation, right?
I want to finish the chairs first. Then that will be painted. I was thinking red for that, too. But, as Janet of The Empty Nest, my personal chalk paint consultant, warned, it takes many coats of red to really cover a piece. And since ASCP is a tad on the expensive side, I am re-thinking my color choice.
Wanna know what else I have been up to? Besides work, that is, which is very time-consuming, but not-so-interesting to blog about.
I went to an auction last weekend.
Shumate's Auctions
I came away with a few good finds. And some not-so-good stuff. I bought this piece of pottery which looked good from a distance, but hideous close up. And a box of stuff filled with old glasses and canning jars in addition to the BBQ set (tongs and brush) that I really wanted. The box also had a cool, old, small-but-deep cast-iron frying pan in it, too. Which sort of made up for the glass stuff, which I so do not need. Thrift store here we come.
I also bought some cool, old costume jewelry, which I have no idea what to do with. I mean, I have a very good friend who I think would probably have fun with some of the stuff. So I could ship it off to her. I bought it thinking I could re-sell it for a little profit. But I have absolutely no idea what, or if, the stuff is really worth.
So, friend (you know who you are), if you don’t think getting a bunch of old, mismatched costume jewelry is tacky, it may be coming your way.
Oh, and Friday night I took the girls to the town Christmas parade.
I had no idea how crowded it would be (very!). I took my camera along, but couldn’t get close enough to the action to get decent pictures because of the girls.
Although I must say, I was quite proud of how well the girls behaved.
Belle, K, and Meg at the Parade
Really. Main Street was packed. Not just with people, but with pets. AND a very loud parade. With marching bands. And noisy vehicles. And horses. Plus at least one dancing cow (I love Chick-fil-A) and not one, but TWO, dancing frogs (Sweet Frog yogurt).
And my girls just sat through it all. Mostly. On the few occasions they did get up, I just had to point and they sat back down.
Amazing. My girls have come such a long way since becoming townies.
So that’s what we have been up to. Today’s project is to decorate the house for Christmas.
If I have any hope of getting that done today, I need to stop this blogging and get busy.
There’s been a lot going on around here lately. I swear, it was just the middle of May, and now we’re almost a full week into June!
My last couple of posts were about Memorial Day weekend. Tuesday through Friday of that week, I was working a bunch of hours to get a job done.
This past Saturday was picture-perfect weather-wise. It would have been a great day for a motorcycle ride. And a wedding shower. That’s what we were supposed to do. But I wasn’t feeling well. So I laid around, indoors. All. Day. Long.
That is so not me. What a waste of a beautiful Saturday!
Sunday, I was feeling better. Still not great, but well enough to do some planting. Which is good. That planting was important. Because Monday the landscape crew was scheduled to finish up at our place. I needed to get the plants into the ground before the mulch was spread.
See? I was so busy last week, I didn’t even tell y’all the landscapers were coming. Or that they had started.
They actually began work on Wednesday. We had them convert our backyard, clay-based, mud pit into a peaceful retreat. They also tore all of the grass out of our side yard, where there was a small but treacherous hill, and built a wall to make a planting bed. While they were here, they weeded and mulched all of our existing planting areas, too. They also planted two bushes I’d bought months ago from another nursery, but didn’t have a place for, other than beside the house.
Wanna see some pics?
The Side Yard - BEFORE
I had planned on shooting specific “before” shots on Tuesday. But then I ended up working until after dark. Luckily I have some pictures from a month or so ago after the fence went up.
The Side Yard - BEFORE - looking in from the back gate.The Other Side Yard - BEFORE
Those stepping stones helped with the mud somewhat. But it was still always a mess back through there.
The Side Yard - BEFORE
It’s hard to tell in pictures just how steep that little hill is. And it gets steeper toward the back. It was very difficult to walk on. And Hubby had a heck of a time mowing the grass.
Back Yard - BEFORE
I don’t have any decent before shots of the back yard because it really was an ugly mud pit. The patio was okay, except it was all uneven. There just wasn’t a lot to brag about, know what I’m sayin’?
Not that I am bragging per se, just showing y’all what a difference a really good landscaper can make.
Side Yard - DURING
Hubby had been complaining that the patio was dirty. I’d never given much thought to how dirty. Or what a difference power-washing would make.
Patio during power-washing.
Hubby didn’t just clean it to make the surface look nice. One of the issues with this house, which we were aware of at purchase, was that the patio and stupidly designed back steps had settled into the ground. The patio was rather wavy and water, instead of draining away from the house, settled in pools.
That was one of the landscaper’s big projects. Remove all of the pavers four feet out from the house, re-level the ground, re-install the pavers and replace the sand between the joints with special polymeric sand that is designed to lock the pavers in place and keep water from penetrating. Hubby had to wash all of the old sand away to make room for the new stuff, which looks like sand, but feels more like brick mortar.
Meg was not thrilled with the pile of stones in her path.
That was the scene on Thursday evening. The crew from Creative Design Landscapes, based in Bealeton, was a hard-working bunch. There were five laborers that did all of this work in four days. Three and a half, really, when you consider that they only got about half a day in on Friday because of the crazy storms that blew through.
Look closely at the top of the wall toward the left of that last frame and you can see the mortar they used to keep the stones from moving around. It looks like a dry-stack stone wall, the mortar just helps keep the stones from shifting.
Anxious to see the after shots? Here ya go…
The Side Yard - AFTER - from just inside the back gate.
We love the way the walls turned out. They used 4 1/2 pallets of stone in the side yard and 1 1/2 pallets in the back. I am so glad we didn’t have to move all that rock ourselves!
Stepping stones in pea-gravel base. No more treacherous grass mowing required.Steppers going up the back hill.
And no more slippin’ and slidin’ to get up that back hill!
Planting bed.View from the opposite direction.Side yard as seen from just outside the front gate.
Isn’t the neighbors’ hydrangea gorgeous?
Freshly weeded and mulched flower beds.
There were lots of plantings here at the house, but everything was overgrown. The original owners of this house had a green thumb. The previous owners were either clueless or just didn’t care enough to maintain the stuff.
Front beds, different angle.
Oh, and we finally moved the birdbath to the front yard. It had been sitting on the back patio, pretty much where the movers left it, since October.
K looking at the birdbath.
One of our next project will be removing that tree with the dead ivy all over it. It’s a mulberry tree, which makes quite a mess. Even when the dogs spend hours picking up the berries for us!
Ignore those brown patches in the lawn, okay? Three girl dogs have that affect on grass, especially when coupled with weed eradication.
The other side yard - AFTER. No more muddy path!It looks so much brighter over there.
Now we’re getting to the best part. The back yard. Are you ready?
Clean and flattened patio.Flagstone paver patio expansion and stone retaining wall.
Chris Bergen, the man who owns the landscaping company, explained that there was polymeric sand used on the flagstones, too. The surfaces will look a bit lighter than usual for a couple of weeks until the slight surface film is worn away.
Flagstone patio with hammock, bench, and dog in place.
I had to ride up to the nursery on Monday afternoon to select plants. Chris had planned a variety of stuff to be planted, but I wanted to change a few of his selections to add a bit more color. Those pink and red flowers with green leaves in front of Belle are astilbe. Originally they were going to be white. Also in front of Belle are some coral bells, which I chose for the red foliage. Chris had also planned for hosta, as seen behind Belle and in front of the hammock, but I opted for the smaller, blue-leaf variety.
New porch (still in progress)
We didn’t have a porch before. There were three steps leading right up to the door. Which made it very hard to open the door. And the steps had not only settled into the ground with the rest of the patio, they’d also pulled away from the building.
New porch (still in progress)
Once Hubby adds that final board and paints over the primer, I’ll post another pic.
Yet another future project will be a little roof over the door and porch.
Patio and porch
You can’t appreciate how much nicer that porch is unless you have seen the original, poorly designed steps.
Here’s a before shot that comes from the house listing beside an after image.
Click on the image above and you’ll get a clearer view. Look closely and you’ll see that the pavers were raised by a couple of inches to achieve the right degree of slope needed to facilitate water runoff.
Back patio from a slightly different angle
That’s one of the anomalies about this house that we will never understand. It’s a well-designed and well-built house full of nice finishes (pocket doors, top-grade door hardware, high-end bathroom fixtures, etc.). Yet there’s also stuff like steps that look like they were built by a junior carpenter. Electrical wiring and outlet placement that makes very little sense. Hose bibs in the stupidest locations. And so on…
For example, there’s no hose bib on the back patio. It’s on the opposite side of the house, about a third of the way up from the back corner, at the top of that crazy hill. The stupidest location ever.
Relocating the hose bibs is another project for Hubby.
We are so glad that we chose Creative Design Landscapes for the job. We were very impressed with Chris, the 33-year-old owner, and his hard-working crew. The pride and professionalism was evident from day one. They knew it was a multi-day job, but every day, they cleaned up the job site, removing trash, placing debris out of the way, sweeping the dirt off the patio, etc. And they were working independently. Yes, Chris stopped by at least once a day to check on their progress, make sure we were happy, etc. But he wasn’t standing over his crew, cracking the whip, telling them what to do, not do, etc.
We would recommend the company to anyone and would use them again in a heartbeat.
If only we had room for one of these outdoor kitchens, as seen on Chris’s web site…
I want one of these!
Oh, and a pond. A big backyard pond full of frogs. A fire pit would be cool, too.
Perhaps after we move out of the city. IF we ever move out of the city.
With a yard like this, and so many nice amenities in walking distance, we may never want to leave!
So, what do you think? Quite a difference, isn’t it?
Those of you who read about Hubby and his sawdust might be wondering if he’s made any progress on the closet project.
Of course he has. We’re talking about Hubby, not me. I have about 30 unfinished projects. Hubby finishes stuff he starts. That’s just one of MANY differences between the two of us.
Before I’ll show you “finished” pics, which are still a LONG way off, I have to share some shots from the deconstruction.
Welcome to our closet.
Our Walk-thru Closet
The closet in our bedroom is probably the biggest thing we don’t like about this house. I still say it is stupid to have to walk through your closet to get to your bathroom. Would it be any dumber to have to walk through your bathroom to get to your closet? I think that would be equally as silly. But the way this house is designed (essentially a big square) it would have to be one or the other. So I guess the walk-thru closet is the lesser of two evils.
It would have seemed less ridiculous if it were properly designed. But there were so many things wrong with that closet. Starting with the carpet on the floor.
The bedroom floor is hardwood. The bathroom floor is ceramic tile. Why just leave carpet in the closet? Weird.
It was poorly organized, too. I guess they were trying to be creative to maximize space. The best way to describe it was one big cluster%$#@.
Stupid Light Switch
The only way to turn the light on in the closet was with a switch on the wall in the bedroom or one in the bathroom. That doesn’t seem too dumb until you think about this… if someone is asleep in the dark bedroom and you need to go into the closet, you either have to remember to shut the door first or risk the sleeper being blinded by the light (revved up like a deuce, another runner in the night — do you remember that Manfred Mann’s Earth Band song?).
Let’s say you do remember to shut the door first, you still have to open it to get into the closet. And, because it opens inward, out pops that blinding swath of light.
So, step one was moving the light switch from the bedroom into the closet. Right inside the door where it makes sense.
Which brings me to stupid thing number three.
There was an ironing board in a little cabinet on the wall just inside the closet door. Which was cool, in a way, if you are a regular ironer of clothes.
Neither of us fit that category.
Then there’s the fact that there was no outlet in the closet, which would be required to actually use an iron. Unless you have one of those old flatirons that you heated on a stove or in front of a fireplace.
For the record, we don’t have a flatiron or a stove. And our fireplace, being gas, just doesn’t throw off that much heat.
There was something else not-quite-right about that cabinet. It was made as a built-in, to be mounted inside the wall so as not to protrude too far into the room.
That cabinet definitely protruded.
When Hubby removed it, he discovered why.
Where the Ironing Board Used to Be
There was a vent pipe (exhaust from the fan in the first floor powder room) behind it. So it couldn’t go into the wall as intended. Rather than relocate the ironing board, the rocket scientist who installed it just pushed really hard to flatten the vent pipe as much as possible and then installed the cabinet on top of it.
The ironing board is gone and now we have a switch inside of the closet where it actually makes sense.
Here are some interior shots of the poorly constructed and not-very-well-designed interior.
Meg
There’s a shot of Meg resting in the closet while Hubby uses the very loud reciprocating saw mere feet away. She was never bothered much by construction noises. She’s even less concerned now that she is pretty much completely deaf.
She’s old.
The young girls, on the other hand, were concerned. They preferred to observe from afar.
Scared of the Noise
After he relocated the light switch, it was time to tear out the carpet.
No More Closet Carpet
It was quite a mess. He also had to tear up all the tack strip used to hold the carpet in place. There was even lots of extra tack strip since they had carpeted around the shelves.
Yeah, that was stupid, too.
What if we had just wanted to move the shelves? We would have been left with holes in the carpet.
Sigh.
Speaking of holes…
The Walls Were a Holey Mess
And the walls behind the shelves? What a mess.
One of the reasons for that was the gazillion nails the installers used to attach the shelves to the wall.
Nail Overload
Rather than tie into a stud, the installers just shot LOTS of nails through the back of the shelving and into the drywall. Each shelf had hundreds, I say HUNDREDS, of nails in it.
Which poor Hubby had to remove since we need those shelves as temporary storage while the cabinets are being built.
The next step is flooring installation.
Exciting stuff, I know. I bet you just can’t wait to read all about it…
Now that the workshop is finished, Hubby has started his first real project.
He is building cabinets for the closet in our bedroom. It’s a walk-through closet (the idea of which we hate) between the master bedroom and bathroom. The builder installed shelves that were of shoddy construction and poor design. Plus, despite having a tile floor in the bathroom and hardwood in the bedroom, there was carpet on the closet floor.
The whole closet was just dumb. So Hubby is correcting it by building cabinets. We’ll still have to walk through the closet to get to the bathroom, but it is sure going to look WAY better when he is finished.
Step one of the closet project was buying the lumber. He got it a month or so ago. Wood needs time to acclimate to its surroundings (adjust to the humidity level).
Hubby with his pile of lumber.
As you can see in that picture, he bought lots of lumber. The darker wood (from his hand down to just below his hip) on top is soft maple. He’ll be using that for the cabinet faces. The lighter lumber at the bottom is poplar. He’ll be using that for one of the closet drawers and another project.
He purchased rough, unfinished lumber. It is WAY cheaper than buying finished wood, especially when you get into hardwoods.
The lumber most of you are probably used to seeing is the finished, dimensional lumber sold at places like Lowe’s, Home Depot, Builder’s Supply, etc. The most-common size of dimensional lumber is the two-by-four.
A two-by-four, which is sold in various lengths, actually measures 1 1/2 inches tall by 3 1/2 inches wide. It is sold by and referred to as its nominal or starting size. The finishing or smoothing out of the wood takes an average of a quarter inch off of each side.
How do you take a quarter inch off? Sanding is one way. But that would take a LONG time. When you need to flatten, reduce the thickness of, and create a smooth surface on a rough piece of lumber, you use a plane (when done by hand) or planer (when powered by electricity).
While I was away on my girls’ weekend at the end of February, Hubby spent the weekend making sawdust. Literally.
Hubby running a piece of unfinished lumber through the planer.
Get this… he filled NINE, 42-gallon trash bags full of sawdust.
Unfortunately, I forgot to take a picture of those bags filling about a quarter of our garage.
"Ze Planer, Ze Planer!"
It takes multiple passes on each surface of the wood to get it to the right smoothness/thickness. But even just one pass makes a huge difference.
A side-by-side comparison.
You have probably figured out that the board on the left is after being run through the planer while the board on the right is the rough wood.
Like most people, I’m more used to seeing the finished stuff. When Hubby showed up with trailer full of rough lumber, my first thought was, “What’s he doing with that junky wood?”
Finished vs Unfinished
There’s the same wood from a wider angle.
Rough lumber is much thicker than the finished piece.
In that last shot, you can see how much thicker the rough wood is when compared to the finished piece. The vertical piece of wood upon which the rough lumber rests, which is 3/4″, is an example of the thickness Hubby had to take each board down to.
Scroll back up to the first shot of Hubby with his lumber pile and perhaps you can imagine how he ended up with NINE bags of sawdust.
What does one do with nine bags of premium sawdust? You could take it to the dump, or you could do the responsible thing (like Hubby) and give it away.
Another unique aspect of horse country is that sawdust is actually in huge demand. Farmers use it as horse bedding. Perhaps other large animals need it, too? Not sure. What I do know is that the lady who responded to Hubby’s ad on Craigslist for free sawdust was THRILLED. Turns out she has some young sons in 4H raising chickens, and chickens love sawdust. Sawdust isn’t cheap.
It was a win-win situation. We got our garage back and she got plenty of free sawdust. She called a couple of days later to report that her chickens, which hadn’t laid an egg for months, were now laying in the sawdust.
Next time we amass a collection of sawdust to share, she’ll bring us some fresh eggs in trade.
Step two of the closet project, which I’ll address in the near future, is demolition.
Any idea how long this entire process is going to take? Let’s just say we’ll be living in a construction zone for a while.